

Welcome to Node.js: Part 6 – Updating a Simple Restful Web App
July 23, 2014
It’s nearly impossible to find an image on the theme of “event horizon” on Google that isn’t somehow related to the incredibly scary 90’s movie. I wanted such a pic to represent the unattainable goal of knowing everything there is to know about programming. The more I learn, the more I learn how much more there is to learn. Kind of like life in general, I suppose.

True. So true.
Philosophical opining aside, we do have a tidy little goal before us now. Up to this point, we’ve fleshed out a little of the terms we’ve needed, chomped through a tutorial by Brandon Cannaday, and followed through two very helpful tutorials (one and two) from Christopher Buecheler. (I worked through each of them multiple times just to make sure I understood them.) At the end of the last guide, Buecheler challenged us to figure out for ourselves how to update user information in our rudimentary database.

No. Not gorilla. garrilla.
One commenter (garrilla) has worked through this assignment. He seems to have got it working, but—with respect—his instructions are incredibly difficult for me to follow, and I think they referenced an earlier version of Buecheler’s tutorial. I’m going to comb through the comments on his efforts for the necessary updates. From here, I’m assuming that you’ve followed through Buecheler’s second guide. I’ll also be using the formatting he outlined in both tutorials (indent = four spaces).
Starting us off on this project, Buecheler informs us that we’ll need to, “GET the info and populate a form with it, then […] PUT on submission of the form […] and update the table.” Specifically, he adds that we’ll, “need to edit /views/index.jade, /routes/users.js, /app.js, and /public/javascripts/global.js just like for adding and deleting.” It also looks like a tiny bit will be added to style.css.
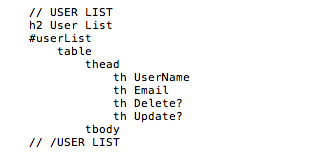
In my mind, it makes sense to add another column to our user list table for the update buttons. This seems a rather ugly way to do it, but we’ve already seen how it could work, so let’s just get something that functions and worry about aesthetics and performance later. This part is easy, even for me. Head into your index.jade file and add the “th Update?” under the “thead”, so that your //User List section looks like below.
Then switch over to global.js, and go to the Functions section. In populateTable you’ll see the bit headlined by Buecheler’s comment, “// For each item in our JSON, add a table row and cells to the content string.” After the line for the delete link and before the line </tr> at the end of this bit, add a new line to place an update link in each of the cells under the Update? column we just created. This section should look like below:
// For each item in our JSON, add a table row and cells to the content string
$.each(data, function(){
    tableContent += '<tr>';
    tableContent += '<td><a href="#" class="linkshowuser" rel="' + this.username + '" title="Show Details">' + this.username + '</td>';
    tableContent += '<td>' + this.email + '</td>';
    tableContent += '<td><a href="#" class="linkdeleteuser" rel="' + this._id + '">delete</a></td>';
    tableContent += '<td><a href="#" class="linkupdateinfo" rel="' + this._id + '">update</a></td>';
    tableContent += '</tr>';
 });
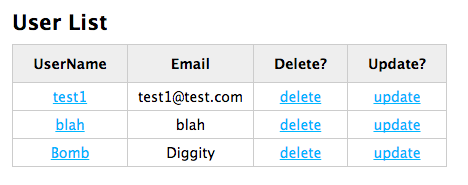
If you feel the need, you can restart your node server (in your terminal, ctrl c to kill it if it’s running, then “npm start” to start it again), then refresh your local host (http://localhost:3000) in the browser, and you should see this under the User List section (the User Info and Update Info sections will have remained the same):
When I am a writer, I shall do parenthetical asides. And footnotes. There will be footnotes. I wonder how you do them? And italics. How do you make italics happen?
-Neil Gaiman
This is the perfect way to make a quick-and-ugly start even uglier, but hopefully it will be easy enough to implement. Next it would be easy enough to add an “Update Info” form similar to the Add User form to which Buecheler led us, but I don’t think it would be a good idea for it to show up empty before the (incredibly handsome and competent) database manager has clicked one of the update buttons.
Here’s where the, “GET the info and populate a form with it,” comes in. When someone clicks an update link, we want to be able to grab the information associated with the username on that row and shove it all into a form for the manager to change.
I know how to set up the page easy enough. Back inside index.jade I’ll wrap the addUser form in a div called addUserChunk, and the new updateInfo form in a div called updateInfoChunk. (garrilla did the same thing—but called them panels—so I’m already kind of headed in the same direction.) Also, we’re adding a cancel button to the Update chunk in case the user changes his/her mind. My index.jade looks like this, now:
extends layout

block content
    h1= title
    p Welcome to our test

    // Wrapper
    #wrapper

        // USER INFO
        #userInfo
            h2 User Info
            p
                strong Name:
                |  <span id="userInfoName"></span>
                br
                strong Age:
                |  <span id="userInfoAge"></span>
                br
                strong Gender:
                |  <span id="userInfoGender"></span>
                br
                strong Location:
                |  <span id="userInfoLocation"></span>
        // /USER INFO

        // USER LIST
        h2 User List
        #userList
            table
                thead
                    th UserName
                    th Email
                    th Delete?
                    th Update?
                tbody
        // /USER LIST

        // ADD USER
        div
        #addUserChunk
            h2 Add User
            #addUser
                fieldset
                    input#inputUserName(type='text', placeholder='Username')
                    input#inputUserEmail(type='text', placeholder='Email')
                    br
                    input#inputUserFullname(type='text', placeholder='Full Name')
                    input#inputUserAge(type='text', placeholder='Age')
                    br
                    input#inputUserLocation(type='text', placeholder='Location')
                    input#inputUserGender(type='text', placeholder='Gender')
                    br
                    button#btnAddUser Add User
        // /ADD USER

        //UPDATE INFO
        div
        #updateInfoChunk
            h2 Update Info
            #updateInfo
                fieldset
                    input#updateUserName(type='text', placeholder='Username')
                    input#updateUserEmail(type='text', placeholder='Email')
                    br
                    input#updateUserFullname(type='text', placeholder='Full Name')
                    input#updateUserAge(type='text', placeholder='Age')
                    br
                    input#updateUserLocation(type='text', placeholder='Location')
                    input#updateUserGender(type='text', placeholder='Gender')
                    br
                    button#btnUpdateUser Update User
                    button#btnCancelUpdateInfo Cancel
        // /UPDATE INFO

    // /WRAPPER
And then I added a small bit to nodetest2/public/stylesheets/style.css. :
#updateInfoChunk {
    display: none;
}
This will keep the infoChunk from showing up before the update button is clicked.
So far, this has been the easy stuff. From here, we’ve actually got to figure out how to wire it all together. I understand a bit of what needs to come next, and I’m sure the solution will be similar to the add and delete functions Buecheler taught us, but it’ll be different enough that I will definitely need to find more information. For one thing, we’ll need an extra function to manage the displaying of the updateInfo chunk.
It turns out this is a similar approach to what garrilla has done, with a few difference. He didn’t bother with a whole new column for the update buttons, but I don’t think that matters too much. He also seems to toggle the visibilities of the add and update user chunks (what he calls panels), which seems like a pretty good idea, and it doesn’t change anything we’ve done so far, so why not implement it. While still in global.js, add the small function that will switch visibilities between the Add and Update chunks. (I didn’t even know about the toggle() function. Thank you, garrilla!).
// Toggle Displaying Add and Update Chunks
function toggleAddUpdateChunks() {
    $('#addUserChunk').toggle();
    $('#updateInfoChunk').toggle();
}
Then, in the DOM Ready section, we can add the several event handlers we’ll need for the new update chunk. We’ll need one to handle clicking the update link in the table, one to handle clicking on the update button itself, and one for the cancel button. garrilla also reminded me that another handler is necessary for the data being changed in the form. The Dom Ready portion should look like this:
// DOM Ready =============================================================
$(document).ready(function() {

    // Populate the user table on initial page load
    populateTable();

    // Username link click
    $('#userList table tbody').on('click', 'td a.linkshowuser', showUserInfo);

    // Add User button click
    $('#btnAddUser').on('click', addUser);

    // Delete User link click
    $('#userList table tbody').on('click', 'td a.linkdeleteuser', deleteUser);

    // Update User link click
    $('#userList table tbody').on('click', 'td a.linkupdateinfo', injectIntoUpdateChunk);

    // Add class to updated fields
    $('#updateInfo input').on('change', function(){$(this).addClass('updated')});

    // Update info button click
    $('#btnUpdateInfo').on('click', updateInfo);

    // Cancel Update User button click
    $('#btnCancelUpdateInfo').on('click', toggleAddUpdateChunks);
});
The injectIntoUpdateChunk function will need to be able to toggle the visibility of the chunks if necessary, and populate the Update Info form with the relevant user’s data, then switch back to the Add User chunk. The “// Add class to updated fields” bit will let us keep track of which fields have been updated once the Update button is clicked. The updateInfo function will take the data from the changed fields and PUT them to the db, changing the user’s data stored there. And if one clicks the cancel button, we’ll simply toggle the chunks with the toggleAddUpdateChunks function.
At this point, I’ve just about hit the limits of what I’d be able to think up on my own right off the bat. And by “right off the bat,” I mean after a several hours of refreshing and reminding myself how these things work. Now, though, I have to lean a little more heavily on garrilla and the helpful few who commented on the same problems I faced.
So while we’re still in global.js, we need to add the injectIntoUpdateChunk and updateInfo functions, and I pretty much would have been lost on my own, but that’s what Mister Internet is here for, and garrilla gave us a good start. I did manage to make a few minor changes here and there to make it work. I’ll show the code for each of these functions and explain, as best I can, what they do.
// inject User info into the Update chunk
function injectIntoUpdateChunk(event) {

    event.preventDefault();

    if($('#addUserChunk').is(":visible")){
        toggleAddUpdateChunks();
    }

    var _id = $(this).attr('rel');
    var arrayPosition = userListData.map(function(arrayItem) {return arrayItem._id; }).indexOf(_id);

    var thisUserObject = userListData[arrayPosition];

    $('#updateUserFullname').val(thisUserObject.fullname);
    $('#updateUserAge').val(thisUserObject.age);
    $('#updateUserGender').val(thisUserObject.gender);
    $('#updateUserLocation').val(thisUserObject.location);
    $('#updateUserName').val(thisUserObject.username);
    $('#updateUserEmail').val(thisUserObject.email);

    $('#updateInfoChunk').attr('rel',thisUserObject._id);
}

Yes. Of course. That makes sense, when you think about it.
Neither Beucheler nor garrila made it very clear what “event.preventDefault” does. Maybe it’s so rudimentary that everyone should just know it. Alas… A quick search tells me that this function does stuff and things, and W3Schools offers a little help in understanding why it’s useful here. It seems to “prevent the link from firing,” allowing the data manipulations to occur without reloading the entire page. I think. The toggle function is easy enough to follow. Then we grab the user’s node-generated identification number with the variable _id.
Buecheler (kind of) explains the fancy programming footwork on display in the arrayPosition variable when he works through his showUserInfo function—it creates an array of the user objects, then gets the relevant index number of the user object we’re trying to change. Then the variable called thisUserObject is… this… user… object… The #updateUser lines fill the respective form spaces with the appropriate data in our user object. And finally the #updateInfoChunk tucks away our user’s node-generated id in the class of the updateUser div, so we can grab it later.
Next, we need the updateInfo function (still in global.js, if that wasn’t clear).
// Update User
function updateInfo(event) {

    event.preventDefault();

    var _id = $('#updateInfoChunk').attr('rel');

    var fieldsToBeUpdated = $('#updateInfo input.updated');

    var updatedFields = {};
    $(fieldsToBeUpdated).each(function(){
        var key = $(this).attr('placeholder').replace(" ","").toLowerCase();
        var value = $(this).val();
        updatedFields[key]=value;
    });

    $.ajax({
    type: 'PUT',
    url: '/updateinfo/' + _id,
    data: updatedFields
    }).done(function( response ) {
        if( response.msg === '' ) {
            toggleAddUpdateChunks();
        }
        else {
            alert('Error: ' + response.msg);
        }

        populateTable();
    });
};
Remember, this function triggers when the user clicks the “Update Info” button in the updateInfo Chunk, so the function in the DOM Ready section—the one that adds the class ‘updated’ to the form fields as they are changed—will have already tagged the relevant fields. Only the fields that have been changed will be updated.
Here, the first two commands are the same as in the previous function: preventDefault, and create a variable for the user id. The fieldsToBeUpdated variable is assigned the bits from the update chunk that have changed. Then we initiate an array called updatedFields to hold the key-value pairs we’re submitting, then fill it with those pairs in the anonymous function.
Then comes the AJAX part, where I’m fuzziest in all of the instructions. It looks simple enough, though, and faithfully submits the new data to replace the old. If everything goes well, the chunks toggle back to normal and the table is repopulated.
(NOTE: The majority of these functions came straight from garrilla, but it took me a while to wrap my head around it all. I stripped out a simple verification from the updateInfo function, and I changed how the user id is retrieved.)
I believe we’re through altering global.js. We’ve done everything we need to do to index.jade and style.css, too. We only need to add one line to the app.js file. Find the two lines that Buecheler referenced a few times—”app.use(‘/’,routes);” and “app.use(‘/users’, users);” and insert the line below. I show all three together so you’ll know what it should look like.
// Super Duper PUT stuff
app.put('/updateinfo/:id',users.updateinfo(db));

app.use('/', routes);
app.use('/users', users);
I’m still a little confused by what exactly routers are or do. I do know we need to add one more to users.js, though. This one looks a little different from the rest.
/*
 * updateinfo.
 */
router.updateinfo = function(db) {
    return function(req, res) {
        var userToUpdate = req.params.id;
        var doc = {$set: req.body};
        db.collection('userlist').updateById(userToUpdate, doc, function(err, result) {
            res.send((result == 1) ? {msg: ''} : {msg: 'Error: ' + err});
        });
    }
};
Anyway, this should be all that’s required. If you restart your node server and refresh your local host page, you’ll see… exactly what you saw at the end of Buecheler’s second tutorial with another column full of update links in the User List table. The “fun” is in hitting one of the update links, watching with a rich glow of accomplishment as the Add User form is replaced by the Update Info form, which is appropriately populated with the relevant data, ready to be changed. Ah… That’s the stuff. Here’s a series of pics showing the process in all it’s glory.
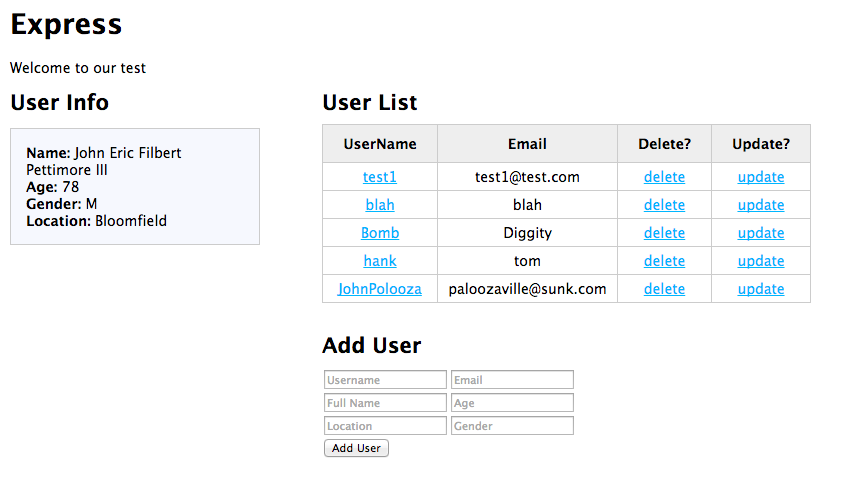
JohnPalooza looks a likely candidate
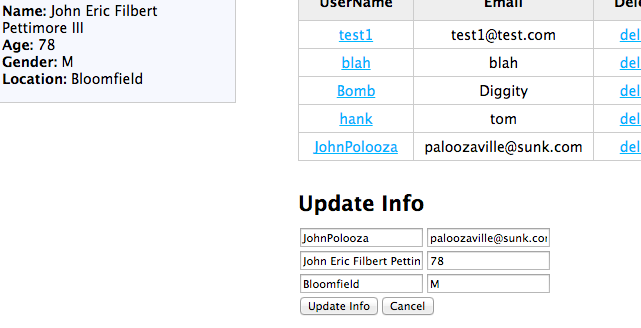
After clicking his update link, the addUserChunk disappears, and the updateInfoChunk takes its place with all the data filled in.
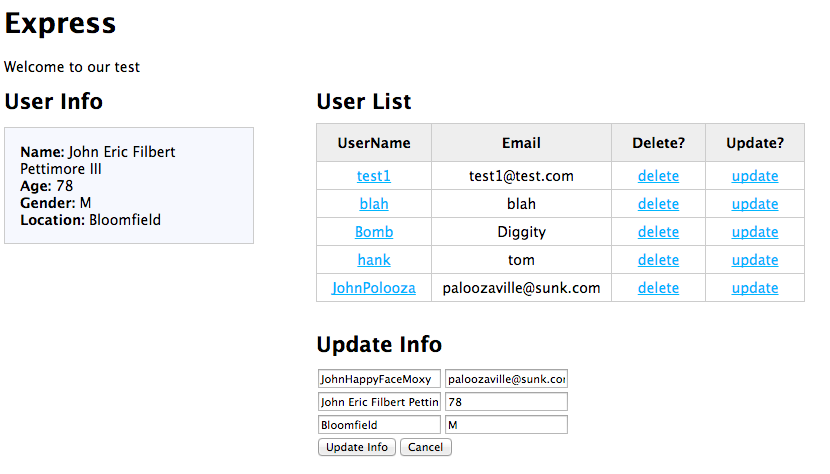
There. That’s a much more appropriate username.
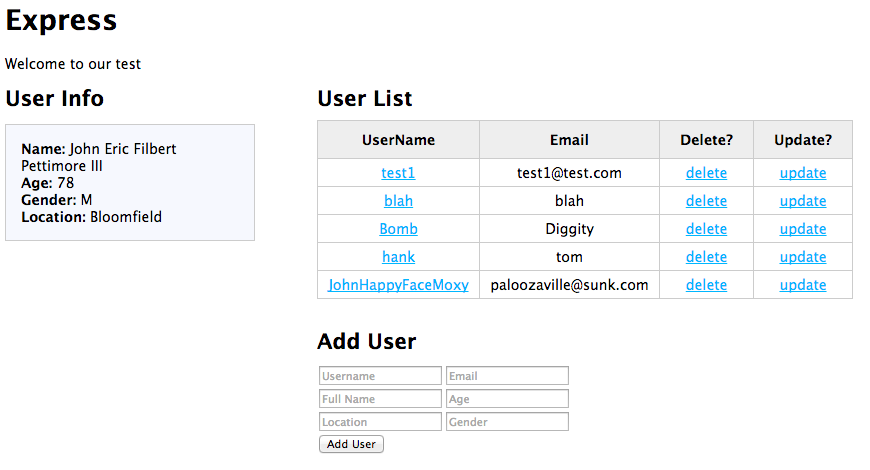
And voila! Click the Update Info button, the chunks toggle, and the table repopulates. That’s science, kids!
Well, this took a while to write. Thank you so much to Christopher Buecheler and garrilla. I hope this is a helpful consolidation of information. It’s not lost on me that very little of this post actually had anything to do with Node.js. I suppose that’s the point; it allowed us to use all Javascript (and html and css), making the server interactions that much easier. From here, we’ll look at AngularJS and find out what it offers in our hunt for the elusive MEAN stack.
Thanks for this helpful post! One minor mistake. The update button didn’t work when I followed your code exactly; I found that it was because of this line:
button#btnUpdateUser Update User
Didn’t match the ID of this line:
$(‘#btnUpdateInfo’).on(‘click’, updateInfo);
It should actually be:
button#btnUpdateInfo Update User
Hi Jason,
Great catch! Thanks so much for posting this to help others out.
when I click on update button,after changing the values,nothing happens..update doesnt work.